¶ Links
Wiki.js supports Markdown, and like many apps, doesn't quite support the full range of Markdown options, while adding it's own options and quirks.
Wiki.js Markdown information
My own Markdown information that expands on this.
Wiki.js also supports an long list of Emojis
¶ Installation
How to install Wiki.js with the following configuration:
- Sitting behind nginx proxy manager, which manages the SSL certifictes
- Uses Postgres.
- Installs wiki.js, nginx proxy and postgres on the same machine all using docker containers
- Uses S3 on AWS to store large file attachments.
These instructions assume that everything will be running on the one machine. I chose an AWS EC2 instance with 2 cpus and 2GB of RAM which is more than enough unless you want to upload large files to wiki.js
¶ Using S3
If you upload large-ish (over 200mb) files into Wiki.js, it uses a heap of RAM during the upload.
That and the fact that it stores the files in the postgres database instead of just storing them in the filesystem means I prefer to host large files on S3.
The other advantage of using S3 is that I can host the wiki on low spec hardware with slower network speeds, but the downloading of files from S3 files will still be quick.
¶ Install Debian or Ubuntu
Install htop and glances for system monitoring
sudo apt install htop glances -y
- htop is leaner
- glances is a chunky app, but it recognises running docker containers
From home directory
mkdir docker
cd docker
mkdir -p nginx-proxy postgres wikijs/wikijs1 wikijs/wikijs2
Go to the nginx-proxy directory
Create docker-compose.yaml
services:
  app:
    image: 'jc21/nginx-proxy-manager:latest'
    container_name: nginx-proxy
    restart: unless-stopped
    ports:
      # These ports are in format <host-port>:<container-port>
      - '80:80' # Public HTTP Port
      - '443:443' # Public HTTPS Port
      - '81:81' # Admin Web Port

    volumes:
      - ./data:/data
      - ./letsencrypt:/etc/letsencrypt

    networks:
      - wikijs

networks:
  wikijs:
    external: true
Create a docker network for nginx to use
docker network create wikijs
From the same directory that the docker compose file is located
docker compose up -d
nginx-proxy starts up with standard username and password, so once you start it, go and change the default logon/password straight away.
The default logon details are:
username: admin@default.com
password: changeme
Connect to nginx proxy by using its public IP or a hostname pointing to that IP
Check it's working by
http://123.123.123.100 or
http://wiki.example.com
You should get a page that says
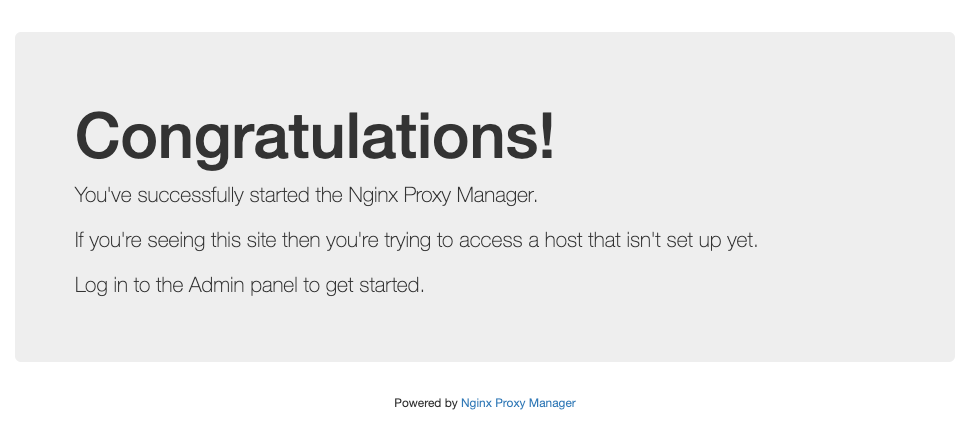
You connect to the admin console, but using port 81
http://123.123.123.100:81 or
http://wiki.example.com:81
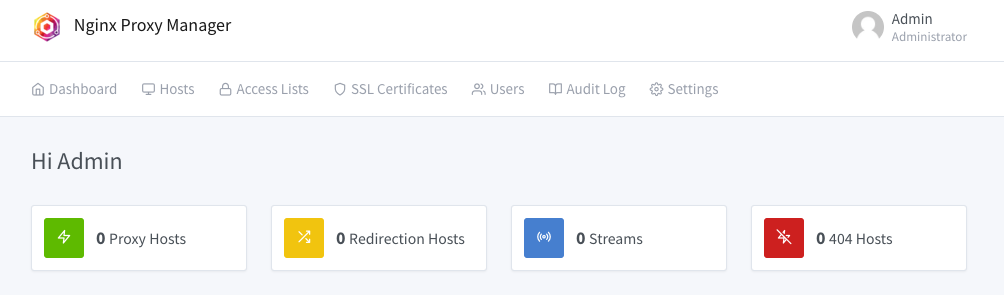
Logon with the default credentials. Change them as prompted and you should then see:
Problem is that this is not encrypted with https. To fix that problem, create a new hostname that you will only use access the admin console of nginx proxy manager.
¶ Admin Hostname
To fix the above mentioned problem with the admin console connecting not being encrypted, create a new hostname in your DNS provider that points to the same public IP.
In these examples:
- hostnames to use the wiki: wiki.bestwikiever.com & bestwikiever.com
- hostname to access the admin console: console.bestwikiever.com
- all these hostnames point to the same public IP of: 10.20.30.40
What we do in the nginx proxy manger is forward https://console.bestwikiever.com to http://localhost:81. You don't seed this redirection on the browser. It just appears as a https connection to console.bestwikiever.com
Note that this doesn't prevent you connecting directly to port 81, but just adds the ability to connect to port 80 using https using a dedicated hostname.
¶ SSL Certificate
First thing is to get an SSL certificate for your hostnames or for the whole domain.
This happens by Let's Encrypt doing various types of challenges to determine that you have legitimate control over a domain.
These certificates come from Let's Encrypt with provide them for free. They last for 3 months, but that doesn't matter as the nginx proxy manager renews them automatically every 2 months.
Here are listed two types of challenges listed here.
- HTTP Challenge
- DNS Challenge
HTTP Challenge
This is the easiest one to do, as it should work as long as the domain host record you are using points to the public IP of your nginx proxy server, and port 80 is not blocked by any firewall.
The downside is that you can't get wildcard SSL certs.
DNS Challenge
This is more complex to setup and requires more access to your DNS provider, but has advantages.
- In theory more secure as you don't have to open up port 80 to your server
- You can get a wildcard SSL cert
A wildcard is like *.domainname, so you can use one SSL cert for any number of hosts in your domain.
HTTP Challenge
From the nginx proxy managers home screen:
- click on "SSL Certificates" tab
- Click button
Fill in the domain names as shown.
Don't seperate the host names with a space. Press enter after entering each hostname so they appear in seperate boxes as shown below.
If you want a wildcard cert, such as mywholedomain.com in the screenshot below enter it as *.mywholedomain.com, but then you'll need to use the DNS Challenge below.
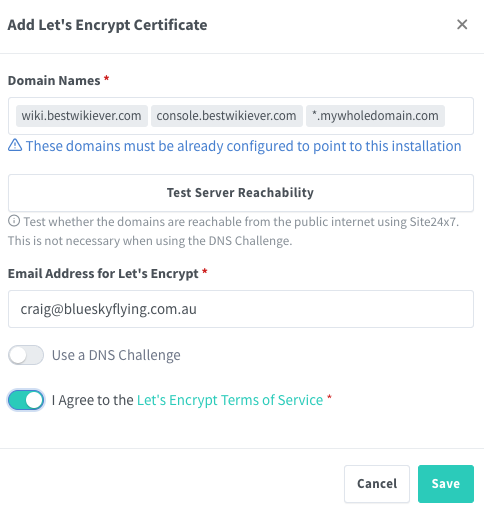
Click on the "Test Server Reachability" to check that Let's Encrypt can access nginx proxy manager to supply the SSL certs for the domains lists.
If it doesn't work, the likely causes are the hostnames aren't pointing to the correct IP address, or a firewall is blocking access.
Click on the "I Agree to the Lets encrypt terms of service", then the Save button.
All going well, you'll get a SSL cert for the domains you put in.
¶ Wildcard Certificate
You can get a wildcard SSL for the entire domain if you select "Use a DNS Challenge". The instructions to follow are then specific to the DNS host provide used.
¶ DNS Challenge using Route 53 on AWS
This is the only DNS provider I use, so I can only include instructions for this service.
Logon to the AWS console, go to Route 53, and go to the domain name you want to use.
Under "Hosted zone details", there will be "Hosted zone ID". Copy this ID
In the AWS console, and go to IAM
Click on "Policies", then the Create Policy button
Click on "JSON" to create a new policy based on the following:
Change the "HOSTEDZONEID#" to the zone id's you got previously from Route 53
{
    "Version": "2012-10-17",
    "Statement": [
        {
            "Effect": "Allow",
                        "Action": [
                "route53:ListHostedZones",
                "route53:GetChange"
            ],
            "Resource": "*"
        },
        {
            "Effect": "Allow",
            "Action": [
                "route53:ChangeResourceRecordSets",
                "route53:ListResourceRecordSets"
            ],
            "Resource": [
                "arn:aws:route53:::hostedzone/HOSTEDZONEID1",
                "arn:aws:route53:::hostedzone/HOSTEDZONEID2",
                "arn:aws:route53:::hostedzone/HOSTTEDZONEID3"
            ]
        }
    ]
}
Give the policy a name
In IAM, go to "Users", then the "Create User" button
Put in a username. Leave "Provide user access to management console" unticked.
Click on Next
Select "Attach policies directly", then choose the policy you created above.
When back at the Users section in IAM, select the new user, and near the top right should be:
Access key 1
Click on "Create access key", select any use case, thenn "Create access key" button
You will be given an access key and a secret access key, which is hidden by default. Click on SHOW to see it.
This is the only time you can access the secret access key, so take a copy. You'll need both keys next
Back to Nginx Proxy Manager
Now you can select "Use a DNS Challenge" when adding a SSL certificate.
If setting up a wildcard cert, make sure you type in the domain name with *. at the front
eg *.example.com
¶ Encrypting the admin console
Now that we have our SSL certs, we can encrypt nginx's admin console.
From the home page of nginx proxy manager:
- Click on "Hosts", select "Proxy Hosts", then "Add Proxy Host"
A card window "New Proxy Host" will come up.
On the Details tab:
Domain Names: wikiadmin.example.com
Scheme: http
Forward Host/IP: localhost
Forward Port: 81
Select "Cache Assets" and "Block Commond Exploits" if you want
On the SSL tab:
Click on the SSL Certificate box to show all available certs.
Click on one that matches the host name entered in the Details tab.
Select Force SSL and HTTP/2 support
Click Save
So, now wikiadmin.example.com takes you to the admin console with https encryption
You can now block port 80, either by taking it out of the above docker-compose file, or blocking it at the firewall level (or both)
¶ Installing Wiki.js
Wiji.js's preferred database is postgresql.
In this example, two seperate instances of wikijs will be installed each with it's own database, but will use a shared postgres docker container.
cd ~/docker/wikijs
docker network create wikijs
Below is the docker-compose from wikijs which is on my Ubuntu machine running Filemaker.
services:
  db:
    image: postgres:17-alpine
    container_name: craig-wiki-db
    environment:
      POSTGRES_DB: wiki
      POSTGRES_PASSWORD: password
      POSTGRES_USER: wikijs
    logging:
      driver: none
    restart: unless-stopped
    volumes:
      - ./db-data:/var/lib/postgresql/data
    networks:
      - wikijs

  wiki:
    image: ghcr.io/requarks/wiki:2
    container_name: craig-wiki
    depends_on:
      - db
    environment:
      DB_TYPE: postgres
      DB_HOST: craig-wiki-db
      DB_PORT: 5432
      DB_USER: wikijs
      DB_PASS: password
      DB_NAME: wiki
    restart: unless-stopped
    networks:
      - wikijs
      - blobbyboo

networks:
  blobbyboo:
    external: true
  wikijs:
    external: true
¶ Upgrading Wiki.js
Very easy to do minor updates. ie, staying within the same major version.
Go to the directory with that wiki's docker compose file
docker compose down
docker compose pull
docker compose up -d
¶ S3 on AWS
Reason for using S3:
I found that when uploading large attachments to wiki.js (over about 400MB) the RAM usage of wiki.js would temporarilty spike such that 2gb wasn't enough.